
By the Arab Seed News Post-Production Team
I’ve lost count of how many times a junior editor has walked into our studio, slapped a “Cinematic LUT” onto a dark, muddy clip, and asked: “Why does this look like garbage?” The answer is almost always the same: You tried to paint a house before building the walls. In the world of high-end video, there is a massive difference between “Color Correction” and “Color Grading.” If you don’t know the difference in 2026, you’re not just making your videos look amateur—you’re destroying your image quality.
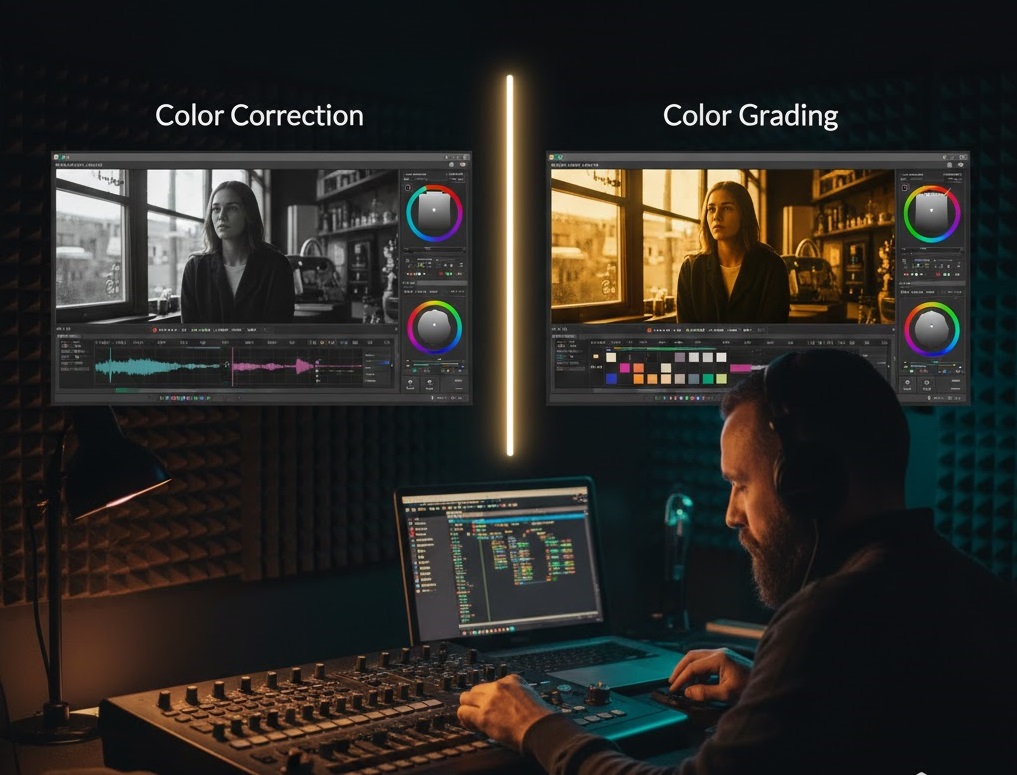
1. Color Correction: The “Fixing” Phase
Think of Color Correction as the technical phase. This is where you make the footage look exactly how the human eye saw it on set.
-
The Goal: To achieve a “neutral” starting point. You fix the exposure (too dark or too bright), adjust the white balance (is the skin too blue or too orange?), and ensure the contrast is natural.
-
Our Rule at Arab Seed News: We never, ever touch a “Creative LUT” until the scopes (Waveform and Parade) tell us that our blacks are at zero and our whites are balanced. If your correction is wrong, your grading will look “dirty.”
2. Color Grading: The “Storytelling” Phase
Once the footage is “corrected” and looks natural, now the art begins. This is Color Grading.
-
The Goal: To create an emotion or an atmosphere. Do you want the scene to feel cold and lonely (Blue tones)? Or do you want it to feel like a nostalgic summer memory (Warm, hazy yellows)?
-
The Magic: Grading is where you create your “signature look.” This is where you manipulate specific colors to lead the viewer’s eye. For example, we might desaturate everything in the background except for the red of a character’s jacket to make them pop.
3. The “LUT” Trap: Why You Shouldn’t Start There
In 2026, everyone sells “Cinematic LUT packs.” But a LUT (Look-Up Table) is a mathematical formula, not a magic wand. It assumes your footage was shot perfectly. Our Advice: If you apply a “Sunset Glow” LUT to a video that was shot at noon with the wrong white balance, the colors will “break” (pixelate and noise will appear). You must Correct first, then Grade.
4. A Simple Workflow to Follow Today
If you want your next video to look professional, follow this 3-step process we use in our studio:
-
Normalization: Bring your exposure and white balance to a natural state.
-
Matching: If you have two different cameras, make sure they look identical in terms of color and contrast.
-
The Grade: Add your creative “look” at the very end of the chain.
The Verdict: Correction is about Truth; Grading is about Emotion. To be a master editor, you need to be good at both. Stop looking for the “magic filter” and start learning how to read your color scopes.
Related posts:
 Confessions of a Video Editor: Why I’m Choosing CapCut Desktop Over Premiere Pro in 2026
 The Silent Killer of Creativity: How to Stop Over-Editing Your Videos
 Beyond the Hype: 5 AI Tools That Actually Save Video Editors Time (Not Just Generate Clips)
 Proxies: The Secret to Editing 4K Video on a Weak Laptop (Without the Lag)